How to use Laravel Multi Auth Package | Multiple Authentication in Laravel
 |
| How to use Laravel Multi Auth Package | Step by Step Explained |
In this article , You are going to learn what is laravel multiple authentication system . We are going to use multi auth package to make it more simple than doing it manually. There are many ways available to create a multi authentication system in your laravel project . But in this article we are going to see the most easiest way to create a multi authentication system in laravel .
We are going to use an github package from Bitfumes . We don't need about the middleware and any other internal thing , this package will take care of all for multiple authentication . This tutorial is totally for beginners , in this article we just gonna learn how can you use Laravel multi auth package in your package and use it .
In this article we will be using laravel 7 but if you are using laravel 5/6 , the steps will be same . So let's see what are the steps to use multi auth package in laravel.
Steps to be Followed :
- What is Multi Auth in Laravel
- Create a Laravel Project
- Setup database
- Installing Multi Auth package
- Check whether the Package works or not
Step 1 : What is Multi Auth in Laravel :
We can simply say use of multiple authentication in a laravel project provides different class of users to access different parts of a single application . Multi Authentication makes our app more secure and reliable , we don't need to create different database for different users . if your app has multiple access types like Super Admin , Admin ,User , Author etc. then you should definiately use multi auth system and obviousely it will be a bit complicated for beginners while doing it manually . so let's implement multi authentication in our project practically .
Step 2 : Create a Laravel Project :
Use the following command a create your Laravel Project :-
composer create-project laravel/laravel project_name
Step 3 : Setup Database :
So the next step is to create a database and connect it to your project in the .env fie on your project like the following . make the following changes on your .env file to connect your database.
DB_CONNECTION=mysql
DB_HOST=127.0.0.1
DB_PORT=3306
DB_DATABASE=database-name
DB_USERNAME=root
DB_PASSWORD=
 |
| .env file cofiguration |

Step 4 : Install Multi Auth Package :
Use the following command to install Laravel Multi Auth Package in your Project .
composer require bitfumes/laravel-multiauth
Make sure you have setup your database connection on your .env file before using the below command . It will take some time and migrate all the tables required for authentication . It will install all bootstrap UI components that are required and also publish them for our project .
php artisan multiauth:install
You can visit the official website of this package to read full documentation of this package by clicking here .
Step 5 : Check Whether package works or not :
To check whether package works or not simply visit '/admin' in your url like following and check whether a beautiful login form appears or not .
http://localhost/project/laravel/multiauth-demo/public/admin
 |
| Login page after installing the package |
Check Your Database :
Check your database which is connected to your project and you will see some tables has been created like following .
 |
| Database after migration |
Login Credentials :
Now your are the super admin of your project and you need login id and password for logging in . So the following are your login id and password for login . to your project .
Login ID : super@admin.com
Password : secret123
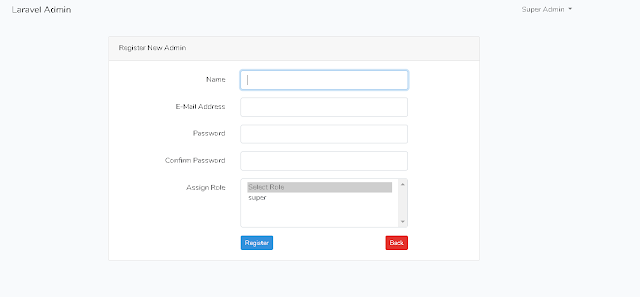
After login you can create different class of users and assign them different roles and permission . So this is all for this article if you want to know more about this authentication you can simply visit the official site of this package .
 |
| Registering new Admin |
 |
| After adding new admin |
This article is for Laravel 7/6/5 .If you have any query regarding multi auth in Laravel feel free to comment . This is the easiest way for beginners to use multi auth package in laravel .
Thank you for reading this article -:)
Hope it Helps your -:)